Talking to software is finally comfortable. A few years ago a phone menu made you press 1 for sales and 2 for support, and then it dropped your call anyway. Today you can say “I need to move my appointment to Thursday” and a voice answers in a natural tone, understands you and does it. The pieces that make this work (speech recognition, a language model and a speech synthesiser) used to take a team months to wire together. Now you can get a working agent in an afternoon.
In this article I will walk you through building one using only the ElevenLabs dashboard. I will not write much code. I will not touch the API unless there is no other way, because most of what you need is a form, a text box and a few buttons. That makes this guide useful for three kinds of readers. Product managers get to see which decisions they own. Makers (people who build things without calling themselves engineers) get a path they can follow alone. Engineers get a map of where the dashboard ends and where their own code begins, so they know when to step in.
By the end you will have an agent with a personality, a voice, a source of knowledge, a few actions it can take, a way to test it and a spot on your website. I wrote the steps in the order I would do them on a real project. If you already have an agent half built, jump to the section you need.
What an ElevenLabs agent is made of
Before you click anything it helps to know what you are building. According to the ElevenLabs Agents overview, an agent coordinates four parts. The first is speech recognition, which turns what the caller says into text. The second is a language model, which decides what to answer. You can choose one from the supported providers or bring your own. The third is text-to-speech, which turns the answer back into a voice. The fourth is a turn-taking model, which decides when the caller has finished speaking and when the agent should stay quiet. That last part is easy to forget and hard to build, and it is a big reason a voice agent feels natural or awkward.
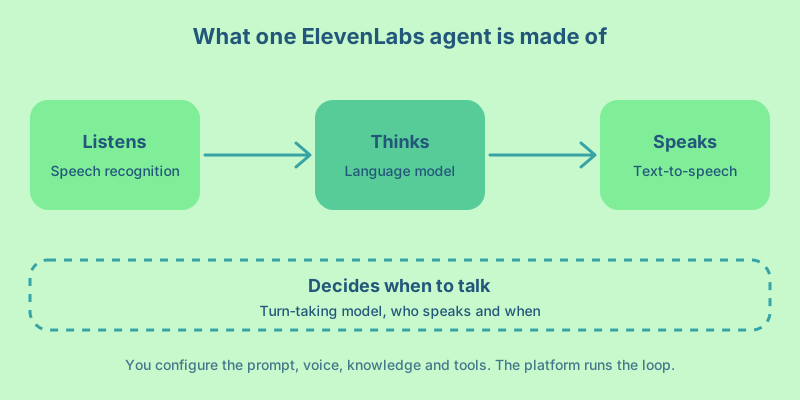
The platform groups its features into three pillars. Build covers the dashboard, the developer toolkit and the visual workflow builder. Integrate covers where the agent lives, such as a web page, a mobile app or a phone number. Operate covers testing, analytics and conversation review after the agent is live. I will follow the same order in this article, and I will stay in the Build and Operate parts because that is where the dashboard does most of the work for you.
One more point on scope. The overview page also lists SDKs for React, Swift, Kotlin and React Native, plus a WebSocket API and a command line tool. Those are good routes when you need a fully custom interface. The same page links to a collection of ready-made interface components too. I am skipping all of them on purpose. Everything below works from the dashboard, and an agent built this way can move to code later without starting over.
Decide the job before you open the dashboard
The most common mistake I see with agents is an agent that does everything. The prompt says “help the user with anything”, the knowledge base holds every document in the company and the agent gives vague answers to all of it. A voice makes this worse, because people expect a person on the line, and a person who rambles feels wrong in seconds.
So take ten minutes before you start and write four short answers.
- Who is calling, and what do they want when they call?
- What does a successful conversation look like, in one sentence?
- What must the agent never do?
- When should it hand over to a human?
Product managers should own these answers. They are product decisions, not technical ones. Keep each answer short enough to fit on a sticky note. For this article I will use a running example. Imagine a small dental clinic that wants an agent on its website. Visitors ask about prices, opening hours and insurance, and they want to book a first visit. The success sentence is “the visitor leaves with an appointment request or a clear answer”. The never list includes giving medical advice. The handover rule says that any emergency goes straight to a human.
Your example will be different, but the shape stays the same. If you cannot fill in the four answers, the agent will not be able to either.
Create the agent
Sign in to the ElevenLabs dashboard, open the agents section and create a new agent. The quickstart tells you to enter a name and choose the “Blank template”. I recommend the blank template for a first agent even when other templates exist. A template gives you somebody else’s prompt, and you then spend your time deleting parts of it. A blank page makes you write down what you decided in the previous section.
After creation you land on the agent screen. It is organised in tabs. The ones I use most are Agent, Voice, Analysis and the call history. The knowledge base and tools are configured from the agent screen as well, and the widget lives under the Channels section. I will go through each one in the order I touch them.
Write the first message and the system prompt
The Agent tab holds two text fields that matter more than anything else you will touch. The first message is the sentence the agent says when a conversation starts. The system prompt is the standing instruction that shapes every answer after that.
Treat the first message as a greeting and an invitation. It should say who the agent is, what it can help with and leave space for the caller to speak. The quickstart example reads “Hi, this is Alexis from (company name) support. How can I help you today?” and that is a good model. For voice, shorter is better. A caller who has to listen to a long greeting before they can speak will interrupt it, and the agent then has to recover from a bad start.
For the system prompt, the ElevenLabs prompting guide suggests splitting it into named sections. The sections are personality, environment, tone, goal, guardrails and tools. I follow that structure for every agent, because each section answers one of the questions I asked you to write down earlier.
Personality says who the agent is. Environment says where the conversation happens and what the caller is probably doing, for example standing in a queue with a phone in one hand. Tone says how the agent speaks, and for voice that means short sentences, no bullet points and no reading out of URLs. Goal lists the steps the agent follows, in order. Guardrails list the rules that never bend. Tools describe the actions the agent can take, which I cover in a later section.
The guide also notes that the models are tuned to pay extra attention to certain headings, especially the one named Guardrails. I take that as a hint to put my non-negotiable rules under exactly that heading and to keep them separate from the nice-to-have style notes. Here is a trimmed prompt for the dental clinic.
# Personality

You are Maya, the front desk assistant for Willow Street Dental. You are warm, calm and patient. You speak
the way a good receptionist speaks, with short sentences and plain words.

# Environment

You talk to website visitors by voice. Many of them are at work or on the move, so expect background noise
and interruptions. Do not read long lists aloud. Offer the two most useful options and ask if they want more.

# Goal

1. Find out why the visitor is calling.
2. Answer questions about prices, opening hours and insurance using the knowledge base only.
3. If they want to visit, collect their name, a phone number and two preferred times.
4. Confirm what you collected by repeating it back. This step is important.
5. Tell them the clinic will confirm by text within one working day.

# Guardrails

- Never give medical advice or diagnose anything.
- If the visitor describes severe pain, bleeding or an accident, tell them to call the emergency number
  and offer to transfer them to a human right away.
- If you do not know an answer, say so and offer to take a message. Never guess a price.
- Never ask for payment details.
A few lines in that prompt come straight from the guide. It says to write only what the model needs to act correctly, because every extra word is a place where the model can misread you. It also suggests flagging critical steps with a phrase like “This step is important”, and repeating the one or two most important instructions. I used the first tip in step four and I would repeat the emergency rule in a longer prompt.
Prompt writing is iterative, so do not aim for perfect on the first pass. Write it, talk to the agent, notice where it behaves badly and change one line at a time. When you change three things at once you cannot tell which one helped.
The guide also recommends specialised agents over one large agent, with a routing agent that sends each request to the right specialist and a defined way to escalate to a human. If your prompt keeps growing, that is the sign to split it. The workflows section below shows how to do that inside the dashboard.
Pick a language model
Further down the agent screen you choose the language model. The LLM page lists models from ElevenLabs, Google, OpenAI and Anthropic, and it also supports a custom model endpoint when you keep credentials in the platform. Model names change every few months, so I will not list them here. Pick the current ones from the dropdown.
What stays true across versions is the trade-off. A larger model reasons better and follows long prompts more reliably, but it answers more slowly and costs more. On a voice call a slow answer feels like a dropped line. A smaller, faster model is often the better choice for a front desk agent whose job is to look up an answer and speak it. I usually start with a fast model and move up only when testing shows reasoning mistakes I cannot fix with a better prompt.
Two settings deserve attention. The first is temperature. Low values, roughly 0.0 to 0.3 according to the docs, give steady and predictable answers. High values, roughly 0.8 to 1.0, give more variety. For anything that quotes prices or policies, stay low. The second is the backup model setting. The docs warn that if you turn backup models off and the main model fails, conversations end abruptly. Leave it on for anything a customer can reach.
Product managers should also know that you pay for the model by the amount of text it reads and writes, and ElevenLabs passes the third-party model cost through at the provider’s published rate with no markup. Long prompts and a large knowledge base are therefore not free, so keep both lean. The docs also state a 2MB limit on the system prompt, which you will never reach if you write it the way I described.
Choose a voice and a language
The Voice tab is the part your users will remember. A voice gives your agent a face, so to speak, and people judge the whole product by it within a few seconds.
The platform describes a library of more than 5,000 voices across more than 70 languages. The voice documentation gives a clear piece of advice for picking one. Choose a voice that matches your target language and region, because that gives the most natural pronunciation. A voice that sounds great in American English may sound odd reading Canadian street names, so test with the words your callers will say.
Audition at least five voices with the same short script. Include a price, a phone number and a date, since those are the places where synthetic voices stumble. Ask a colleague who has not seen the candidates to rank them. Your own taste is a poor guide here, because you already know what the agent is supposed to say.
The docs also describe a few controls worth knowing.
- Speed ranges from 0.7x to 1.2x, and the default is 1.0. Start at the default and change it only if testers complain.
- You can set a different voice for each supported language, so a French caller hears a voice that is natural in French.
- An agent can switch between voices, which helps for storytelling or language tutoring.
- Pronunciation dictionaries let you fix brand names and medical terms using IPA or CMU notation. The page says phoneme-based control is limited to one model family, so check that before you rely on it.
- Voices that have live moderation enabled cannot be used in agents.
The quickstart adds one trade-off I want you to remember. Higher-quality voices may increase response time. The difference is small in text but big on a call, so after you pick a voice, run a real conversation and judge the pauses.
If you serve callers in more than one language, set the agent’s language and add the extra languages in the same settings area. Then write your prompt so that the agent answers in the language of the caller. Test each language yourself or ask a native speaker, because a prompt written in English can produce stiff phrasing in another language.
Give the agent knowledge
Your prompt should hold the personality and the rules. It should not hold the facts. Prices, policies and opening hours change, and you do not want to edit the prompt every time they do. That is what the knowledge base is for.
The knowledge base accepts three kinds of input, which are files, links to web pages and pasted text. Files can be PDF, Word, plain text, Markdown, HTML or EPUB, with a 20MB limit for each. For a small business this means you can upload the price list as a PDF, add the link to the FAQ page and paste the opening hours, all in a few minutes.
There are two ways the agent uses a document. In full context mode, the whole document sits in the prompt for every turn. That is simple and accurate, but it only works for smaller documents, and the docs put the ceiling at about 300,000 characters. In retrieval mode (retrieval-augmented generation, or RAG), the platform indexes the document ahead of time and pulls only the passages that match what the caller asked. This lets an agent draw on far more material than fits in the prompt. The default setting chooses between the two for you, using retrieval when it is enabled and the document is indexed.
My rules of thumb for the knowledge base are these.
- Keep each document focused on one topic. The docs say that smaller, focused documents improve retrieval.
- Write for the ear. A table of prices copied from a website reads badly when spoken, so add a short plain-language summary at the top.
- Remove what you do not want said. If an old price list is in there, the agent will find it.
- Read real conversation transcripts every week and add the answers that were missing. The docs recommend the same habit.
An engineer can help here by pointing the knowledge base at pages that stay current, such as a public pricing page, instead of an uploaded copy that goes stale. A maker can do the same with no code, because a link is a link.
Let the agent take actions with tools
An agent that only talks is a nice demo. An agent that can do things is a product. In the ElevenLabs dashboard, actions are called tools, and the tools page lists several kinds.
Client tools run in your own app, for example on the visitor’s browser. A client tool could scroll the page to the pricing table when the agent mentions it. Webhook tools call an external service, which is how the agent checks a calendar, creates a ticket or looks up an order. Code tools run a small piece of JavaScript in a sandbox that ElevenLabs hosts, so you can do light logic without running your own server. MCP tools connect the agent to servers that speak the Model Context Protocol, an open standard for giving AI models tools and data. System tools are built-in actions for common needs, such as ending a call or handing the conversation to a person.
The page also mentions two small settings that improve the feel of a call. Tool call sounds play soft audio while a tool is running, so the caller does not hear dead air. Tool interruptions control whether the caller can cut the agent off while it is waiting on a tool.
For the dental clinic, I would start with the least risky tool, which is a webhook that writes an appointment request into a spreadsheet or a booking system. The agent never confirms the booking itself. It collects the details, sends them and tells the visitor that the clinic will confirm. That keeps a human in charge of the calendar until you trust the agent.
This is where the prompt and the tool meet, so write the tool description carefully. The prompting guide asks for precise parameter descriptions, explicit formats with examples (an email written as john@gmail.com, for instance), guidance on when and why to use each tool and a plan for what to do when a tool fails. A tool that fails silently is the fastest way to lose a caller’s trust. Add a line to the guardrails that says what the agent should do when a tool returns an error, such as apologising, offering to take a message and ending politely.
For a product manager, the question to ask about every tool is what the worst outcome would be if the agent used it at the wrong moment. Reading a price wrongly is embarrassing. Cancelling a booking by mistake costs money. Start with tools that read, add tools that write once the reading tools behave and keep irreversible actions behind a human check.
Split complex conversations with workflows
If your agent has grown a long prompt full of “if the caller says X, then do Y”, the workflows feature is the cleaner answer. It gives you a visual canvas where the conversation is a graph of steps, so each step can have its own small prompt, tools and knowledge.
The canvas has a handful of node types. A subagent node changes how the agent behaves at that point. It can swap the prompt, the model, the voice, the knowledge or the tools for that stage of the conversation. A dispatch tool node makes sure a specific tool runs, and it can route differently on success or failure. An agent transfer node hands the call to another agent. A transfer to number node passes it to a human on a phone line. An end node closes the conversation.
Edges connect the nodes and carry the rules. A condition can be written in plain language for the model to judge, for example “the caller wants to book a visit”. It can also be an expression, which is deterministic logic over variables and does not depend on the model’s reading. You can also draw edges backwards to retry a step, such as asking for a phone number again when the first one sounded wrong.
I find workflows most useful in three situations. The first is routing, where a front agent decides whether the caller needs sales, support or billing and sends them to the right specialist. The second is limiting risk, where a payment tool is only available during the checkout step, so the agent cannot reach it at any other time. The third is cost control, where a simple model handles the greeting and a stronger one takes over when the question gets hard.
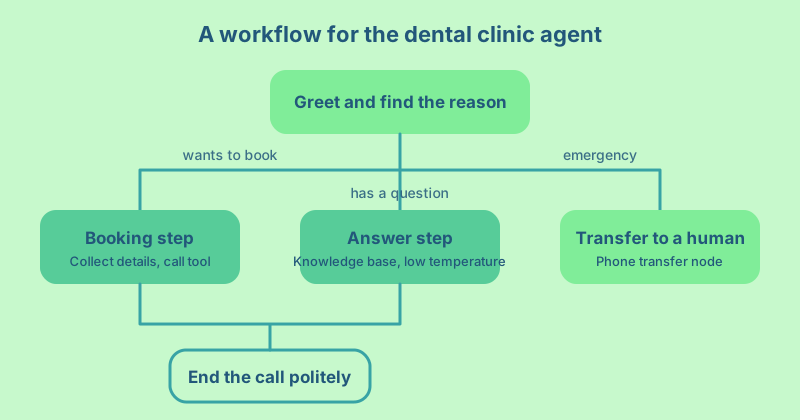
You do not need a workflow for your first agent. Build the simple version first, notice where the prompt strains and move that part into a workflow. A product manager can read the canvas like a flow chart, which makes it a good place to review the conversation design together with the engineers.
Make it personal with variables
Once the basic agent works, the next improvement is for it to know who is calling. The
personalization page describes dynamic
variables, which you write in the prompt or the first message with double curly braces, such as {{ customer_name }}.
When the conversation starts, your site or your system fills in the values, and the agent speaks to the person by name
and with their context.
The page names a second group called system variables. Their names start with system__ and they are filled in by the
platform, so a caller or a client cannot override them. There are also overrides, which replace the whole prompt, first
message, language or voice for a single conversation. The docs say dynamic variables are now the recommended way for
most cases, and I agree. A variable changes a detail while the agent’s behaviour stays the same, and that is much easier
to test.
Be careful about what you put in variables. Whatever you pass in can end up in the conversation, so do not include anything you would not want read aloud. The platform’s authentication and privacy settings are worth a careful read before you connect real customer data.
Test the agent before anyone else does
When the agent first works, the temptation is to ship it. Hold on for a day and test it properly, because voice agents fail in ways that text chat does not, such as talking over the caller, mishearing a name or going silent after a tool call.
The dashboard has a button to start a test conversation with the agent. Use it a lot in the first hour. Talk the way your customers talk, with filler words, a half-finished sentence and a change of mind. Try the topics you told the agent to avoid. Ask for a refund when it can only book. Say your phone number fast. Say it again with a noisy background.
Then move to structured tests. The testing documentation describes three kinds.
- Simulation tests run a whole conversation between your agent and a simulated user. You write a scenario and the success conditions, and you set a maximum number of turns, from 1 to 50.
- Next reply tests check a single answer. You supply the chat history and describe what a good reply looks like, and an evaluator model judges the answer against it.
- Tool call tests check that the agent calls the right tool with the right parameters. You can match exactly, match a pattern or ask a model to judge whether the call makes sense.
You can create these tests from scratch or from a real conversation. When a live call goes badly, the dashboard has a “Create test from this conversation” action that prefills the context, and you describe what the agent should have done. I like this habit a lot. Every bad call becomes a permanent check, so the same mistake does not come back after your next prompt change.
Because models are probabilistic, one passing run proves little. The docs describe running a test several times (between 2 and 20) and looking at the pass rate. A test that passes four times out of five tells you something that a single green tick hides. Engineers can run the same suites from the command line, which makes it possible to run them before every deploy.
The testing page suggests trying persona consistency, multi-turn reasoning, prompt injection and ambiguous requests before launch. I would add one of my own. Hand the agent to someone who has never seen it and say nothing. Watch what they try. Their first thirty seconds will show you more than a day of your own testing.
Measure what matters with analysis
You decided what success looks like at the start. The Analysis tab is where you teach the platform to check for it.
The analysis documentation covers two features.
Success evaluation lets you write criteria in plain language, and after each conversation the platform judges whether
the criteria were met. The quickstart gives a sample named solved_user_inquiry with a description of what success means.
Data collection lets you list the facts you want pulled out of each conversation. You add an item, choose its type (for
example a string), give it a name such as user_question and describe how to extract it.
For the dental clinic I would define two success criteria and four data items. The criteria are “the visitor received a correct answer” and “a visit request was captured with a name, a phone number and a time”. The data items are the visitor’s name, phone number, preferred times and the main reason for the call. After a week of calls, the share of conversations that met each criterion becomes your first honest product metric.
The results appear in the call history, where you can open every conversation, read the transcript and see the evaluation next to it.
Make a weekly habit of reading ten conversations, and include the ones marked as failures and a few that were marked as successes. The failures show you what to fix. The successes show you whether your criteria are strict enough, because a criterion that everything passes does not measure anything. The overview page also lists analytics, experiments and conversation search under the Operate pillar, and those become useful once you have enough traffic to compare versions.
Evaluation results and collected data can also go to your own systems through post-call webhooks. That is the moment an engineer joins the project, to send a new lead into the CRM or a failed call into a support queue. Until then you can learn a lot from the dashboard alone.
Put the agent on your website
The quickest way to publish is the widget. Open the Channels section, choose Widget and customise it. The widget documentation lists what you can change from the dashboard without any code.
You can change the colours of the background, text and buttons so the widget fits your brand. For the avatar you can use a gradient orb with two colours of your choice, or upload your own image. All the text in the widget can be edited, including button labels and state messages. You choose the input mode too, which is voice only (the default), voice with text, or chat only. That last mode matters more than people expect, because many visitors browse in a meeting or on a train and will not speak to a web page. You can also turn on feedback collection, show terms and conditions written in Markdown before a conversation starts and set an allowlist of the domains where the widget may run.
Then the embed. The docs give a short snippet to paste in the body of your page, with your agent’s id in it.
<elevenlabs-convai agent-id="your-agent-id"></elevenlabs-convai>
<script src="https://unpkg.com/@elevenlabs/convai-widget-embed" async type="text/javascript"></script>
Per the docs the agent has to be public, with authentication turned off, for this embed to work. That is fine for a front desk agent that answers public questions. It is not fine for an agent that reads private customer data, and for that case you should use the authentication options and talk to an engineer before you publish.
This site is static, so a snippet like the one above is all it takes to add an agent to any page. A maker with a site builder can paste it into a custom code block. An engineer with a framework can add it to the layout. Either way the agent starts working the moment the page loads, and you can change its prompt, voice and knowledge from the dashboard without touching the site again.
The overview also lists phone options, namely a SIP trunk, Twilio integration and batch outbound calls. They come after the website. A phone number changes the audience, the expectations and the law around recording calls, so treat it as a second project, and not as a checkbox on the first.
Who does what on the team
Building an agent in the dashboard blurs the usual job boundaries, so it helps to say who owns what.
Product managers own the job, the success definition, the guardrails and the handover rules. They also own the weekly review of conversations, because the transcripts are the best user research you will get all month. If you are a product manager reading this, you can write the first prompt yourself. You do not need an engineer to get started.
Makers own the speed. They build the first version, connect the simple tools, embed the widget and iterate on the prompt. They can do all of that from the dashboard. The most important thing a maker can do is to ship a narrow agent early and learn from real calls.
Engineers own the edges. They build the webhook behind a tool, secure the data that the agent can reach, wire the post-call webhook into the company systems and put the test suites into the release process. They also decide when the dashboard is not enough and the SDKs are worth the effort. In my experience that moment comes later than people think.
Your first week
Here is a plan you can follow, with one small goal for each day.
- Monday. Write the four answers (who, success, never, handover) and the first draft of the prompt. Create the blank agent and paste the draft in.
- Tuesday. Pick the model and audition five voices. Write the first message and talk to the agent for an hour.
- Wednesday. Upload the three most useful documents to the knowledge base and check that the agent answers from them. Add one read-only tool.
- Thursday. Write ten tests from the conversations that went wrong, including a few that try to break the guardrails. Add the success criteria and the data to collect.
- Friday. Embed the widget on one low-traffic page, behind a domain allowlist. Tell five friendly people to try it and read every transcript on Monday morning.
The agent will be imperfect on Friday, and that is fine. What matters is that it is real, it is narrow and you now have conversations to learn from. Everything after that is a loop of reading, fixing and testing again. When it works well, help people find it. How to market your AI Agent shows how to get AI assistants to recommend it.
I started this article by saying that talking to software has become comfortable. The nicest part is that building it has become comfortable too. Pick one small job, give it a good voice and let your first callers show you what to do next.